
VPN tests and checks – why should we run them?
By design, VPNs are supposed to help with anonymising your online presence and activities.
Sadly, though, not all of them work as advertised. Some VPNs, including those I’ve tested myself, are prone to IP, DNS or WebRTC leaks. And if your provider is found to have any of these VPN leaks, your location and internet activities are effectively exposed.
Add to that slow connection speeds, and you end up with a completely useless product. Worse still is if you’ve paid good money for it.
But there are several ways to run VPN tests and to check if your VPN is working properly. In fact, this is a process we at BestVPNz.com follow for all of our in-depth VPN reviews.
In this guide, I’ll explain how you can check your VPN connection for potential leaks as well as measure speeds to ensure of good performance.
What’s in this guide? 🔎
- Common problems with VPNs
- Testing for DNS & IP leaks
- Checking your torrent IP (while using a VPN)
- Testing VPN connection speeds
- Scanning your VPN for viruses & malware
- Useful VPN testing tools
VPN problems users often face
Some of the most common issues VPN users face are:
- VPN leaks. Specifically IP address, DNS, WebRTC leaks and torrent IP leaks.
- Slow speeds & connection dropouts. Websites are slow to load, video streams are constantly buffering or there’s no connection at all.
- Viruses & malware – a particularly big problem with free VPNs.
DNS & IP leak tests 🧪
Let’s go over in more detail on how to run VPN tests to correctly spot and prevent DNS or IP leaks.
What is a DNS leak?
DNS, which stands for “domain name system”, is used to translate a website domain name (e.g. bestvpnz.com) into a IP address which comes in numerical form (e.g. 1.22.33.444).
Whenever you’re accessing a website, your computer contacts a DNS server to request that website’s IP address. By default, your network settings are likely configured to use your ISP-assigned DNS. However, if you’re not using secure DNS or have a VPN that leaks, this creates two big privacy issues:
- Your internet activities are exposed to your ISP and on the internet,
- Your ISP almost certainly keeps logs of all your DNS requests.
How to check for DNS and IP leaks?
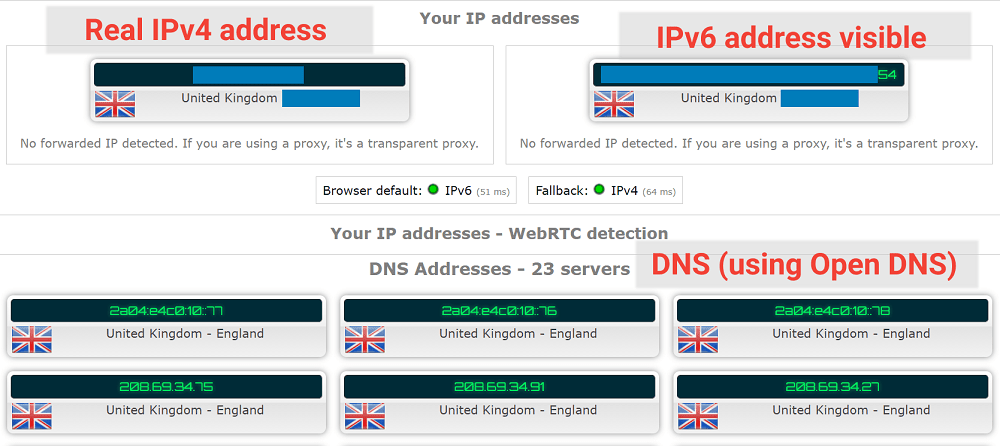
1. Find out your original IP and DNS addresses
Firstly – before connecting to a VPN – it’s worth taking note of the IP and DNS addresses assigned to your connection by your ISP.
For my example, I ran a quick check on ipleak.net. As expected, it detected my real IPv4 and IPv6 addresses.
| As a precaution, I had already configured public DNS addresses in my network settings. It’s highly recommended to use public DNS over ISPs’ default servers in case your VPN suffers from DNS leaks. There are plenty of public DNS options out there, but among the most popular ones are Open DNS and Google Public DNS. |
2. Connect to the VPN
Assuming you already have access to a VPN, connect to any preferred VPN server.
If in the settings the VPN client includes an option like DNS leak protection or Use custom DNS – make sure to enable it.
With some VPNs, you might also have the option to enable IPv6 leak protection.
In my example below with PIA VPN, I configured my connection to use the provider’s private DNS resolvers (PIA DNS).
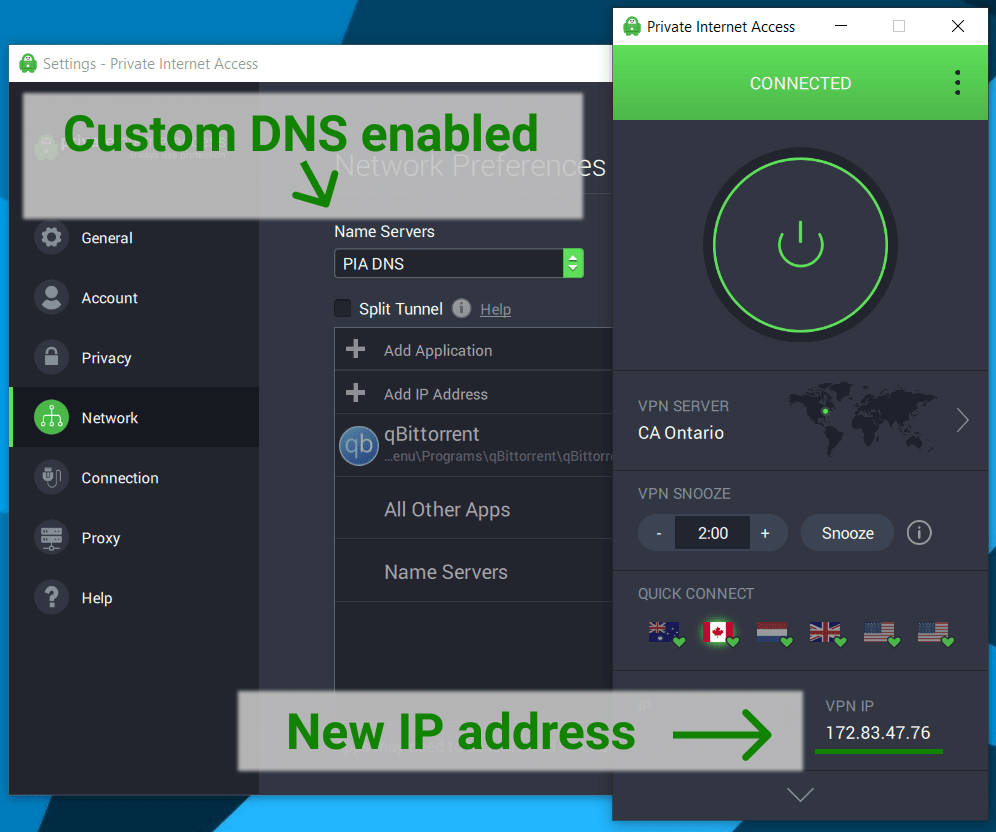
Once connected, this particular VPN client shows the new IP address assigned to me.
But this isn’t enough of a confirmation to accept at face value, so now we’ll need to run some actual VPN tests.
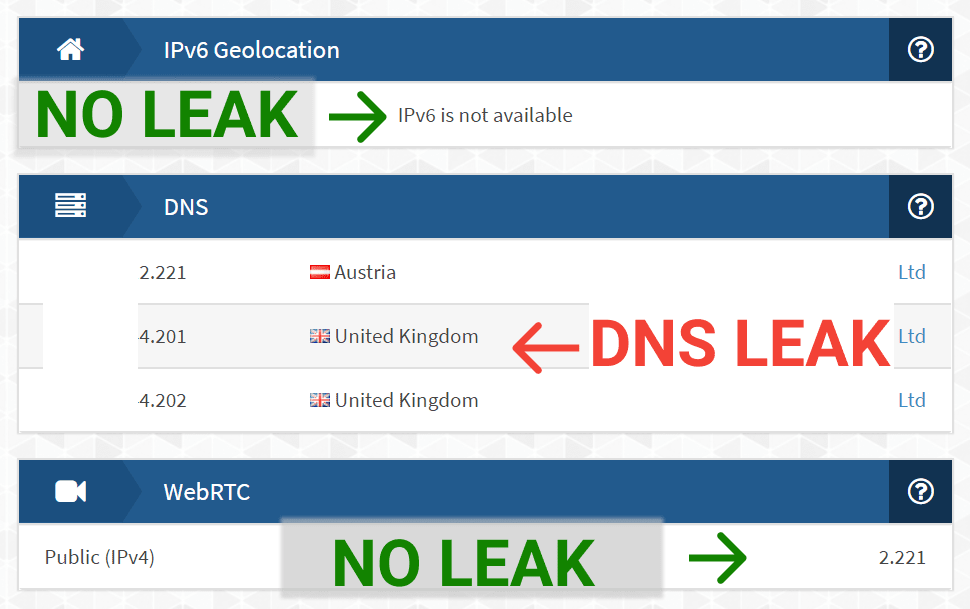
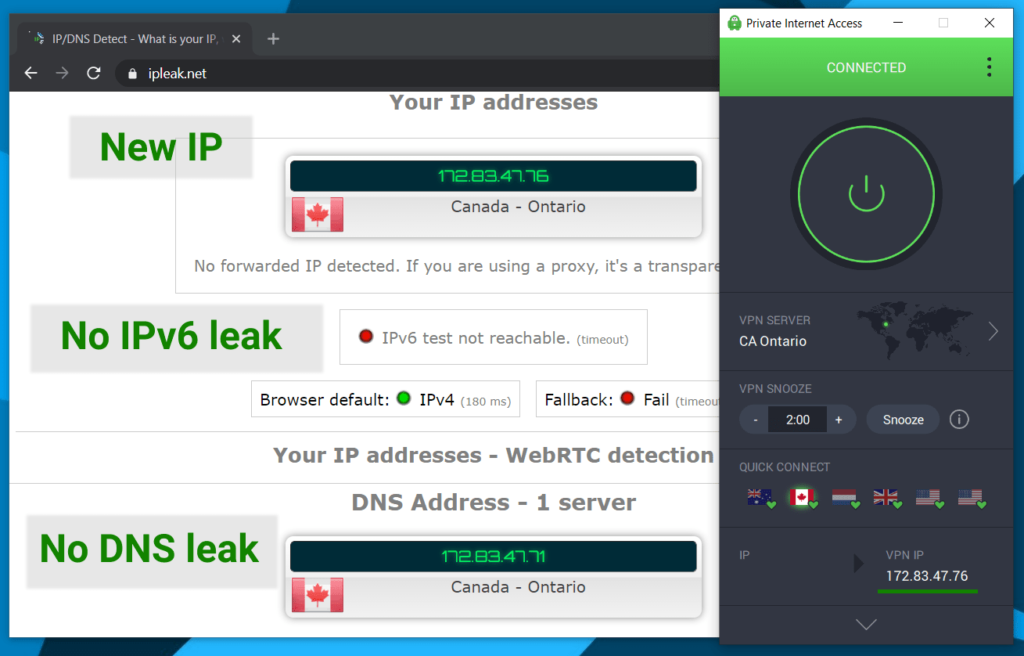
3. Check the VPN for DNS, IP & WebRTC leaks
Next, run an IP & DNS leak test while connected to the VPN.
I did so myself, and you can see the results in my example:
- My connection was assigned with a new IP (nice) ✔️
- My IPv6 address was not reachable (great) ✔️
- I was using my VPN’s secure DNS servers (perfect) ✔️
4. Run a separate WebRTC leak test, if needed
In case your VPN leak test tool doesn’t detect WebRTC, like in my example above, you can always run a parallel check on another resource.
I did so myself using ipx.ac, which confirmed that the VPN wasn’t leaking my real IP address via WebRTC.

If in this part of the VPN tests you see your real IP address, it means your VPN has WebRTC leaks.
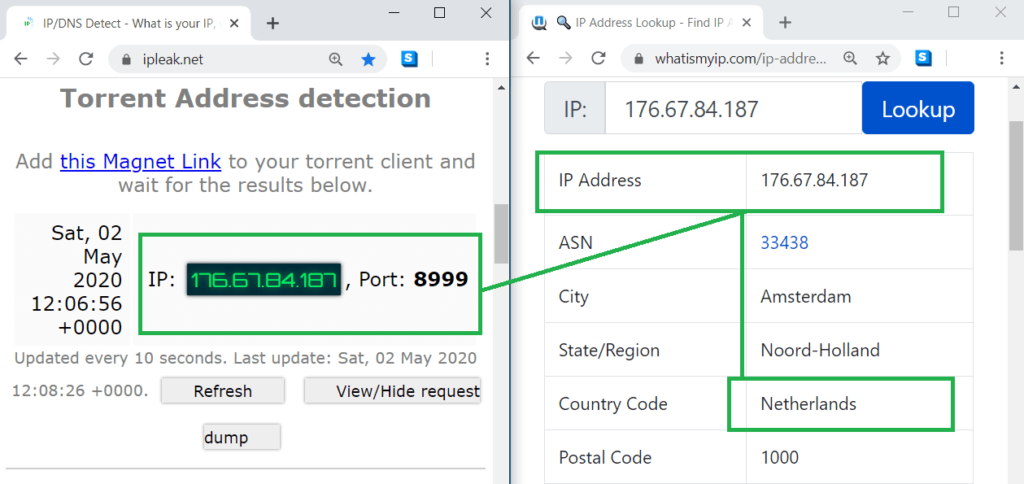
Torrent IP check: how to torrent safely
To check if a VPN is safe for torrenting, it’s absolutely essential to rule out any potential torrent IP leaks.
The easiest way to run this check is to:
- Connect to the VPN
- Go to ipleak.net
- Under Torrent Address Detection, click Activate
- Download and add the test magnet link to your BitTorrent client
- Check the IP address being picked up by ipleak.net
If the IP matches that of the VPN, it’s safe to torrent.
| Note: Make sure your VPN allows torrenting before running any P2P traffic through its servers. If it does, double check if you need to use special P2P-compatible servers as some VPNs restrict this to designated nodes only. |
VPN speed test ⚡
Whichever VPN you choose, using one will inevitably slow down your connection speeds.
But by how much your speeds will reduce depends on several factors, like server bandwidth and user load, the distance between your location and the server, the VPN protocol being used as well as encryption strength.
For instance, stronger VPN encryption normally results in slower speeds, and vice versa.
How to test VPN speed?
Testing VPN speeds is a simple and relatively quick process. When running a speed test, you’ll mainly be looking at four things:
- Ping rate / latency (measured in milliseconds). The time it takes for the VPN server to respond
- Download speeds (megabytes per second). How much data you can download on average per second.
- Upload speeds (megabytes per second). How much data you can upload on average per second.
- Drop-off rate (as a percentage %). How much your bandwidth reduces by when connected to a VPN.
1. Run a normal speed test (no VPN)
Before connecting to a VPN, run a basic broadband speed test to find out your baseline connection download and upload speeds.
Below is an example of my WiFi network speeds from a test run on speedtest.net:
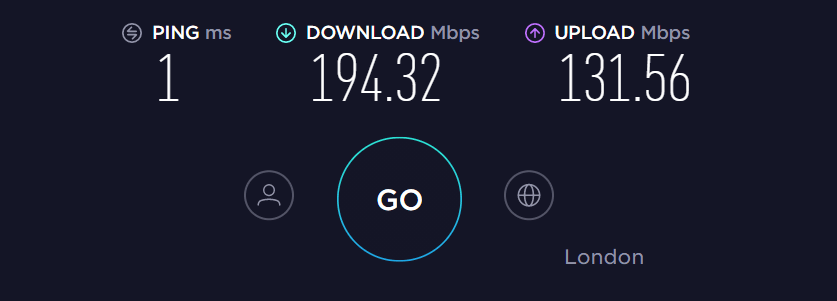
Speeds without VPN
- Ping: 1ms
- Download: 194.32 Mb/s
- Upload: 131.56 Mb/s
2. Connect to a VPN & run the speed test again
Now that you know your speed benchmarks, you can connect to your VPN and run the speed test once more.
| For optimal results, I recommend choosing a VPN server as close to your real location as possible. Likewise, use the fast and efficient WireGuard protocol, if your VPN supports it. |
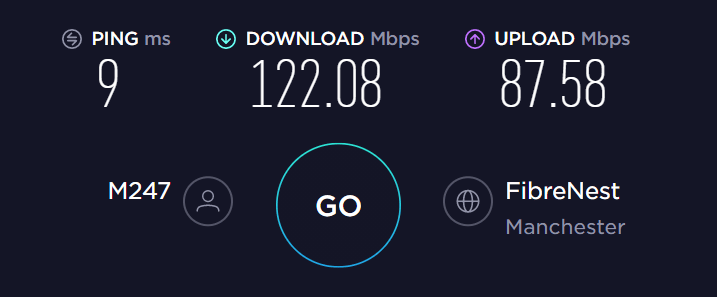
Speeds with VPN
- Ping: 9ms
- Download: 122.08 Mb/s
- Upload: 87.58 Mb/s
- Drop-off rate: -37.2%
As you can see, the drop-off rate was around 37%, which isn’t really big enough to cause a noticeably poor browsing or streaming experience.
However, if you connect to a VPN location much further away from your own (e.g. Germany to Canada), you should expect a slower ping response time along with higher drop-off rates. You might, for example, notice web pages are taking longer to load.
You’ll also likely experience the difference even more with bandwidth-heavy activities like video streaming or online gaming.
My VPN is slow – how can I speed up the connection? 🐌
If your VPN connection is unbearably slow, there are a few things you could do to optimise its performance.
Here’s a simple checklist of things to try out that could help improve your VPN speeds:
- Try connecting a different server
- Use a faster VPN protocol (e.g. WireGuard)
- Tweak encryption strength – weaker encryption means better bandwidth
- Use an Ethernet connection over WiFi
- Change your VPN provider (as a last resort)
1. Change the VPN server
When too many people are connected to the same VPN server, there’s less bandwidth to go around.
Most VPN providers will show the running capacity of each server either within their apps or on dedicated location status pages like this. And the closer the server load is to a 100%, the slower the speeds you’ll likely experience.
Also, if it’s an option, choosing a VPN location closer to your own should reduce the latency and also improve the throughput. For example, if you need to connect to any US location from Europe, it would be better to use an East Coast gateway rather than on the West Coast, as the east would be closer to you geographically.
3. Use a faster VPN protocol
If your VPN supports it, the lean and efficient WireGuard protocol offers excellent speeds, especially with faster broadband connections. Though because it’s still an emerging protocol, not all potential flaws may have been ironed out yet.
With OpenVPN, you’ll normally get better throughput when using the UDP protocol over TCP. This is because – unlike TCP – UDP doesn’t check data packets for errors. Nor does it guarantee their delivery, making it the faster protocol at the expense of reliability.
I don’t recommend using the PPTP or L2TP protocols. Although they’ll give you faster speeds, their security is deemed too weak.
4. Use weaker encryption
That’s right. Stronger encryption demands more bandwidth overheads. Or, in other words, stronger security usually results in slower speeds.
However, take “weaker” with a grain of salt.
For instance, by downgrading from 256-bit to 128-bit encryption, you’re still working with excellent security levels.
In fact, it’s estimated that today it would take a modern supercomputer to crack a 128-bit cipher many billions of years. We’re talking a very long time.
Certain providers – like Private Internet Access – have this option built in to their VPN clients, so you can adjust encryption strength yourself, as needed.
5. Change VPN providers
Some VPNs are simply not built for performance. It might be because their infrastructure isn’t good enough. It could also be because they have too many users (and not enough servers).
If all else fails, it might be worth considering switching to a good VPN offering faster speeds than you’ve been used to.
VPN virus & malware scan (before you install)
One really important thing to do before installing any VPN software on your computer or mobile device is a good old virus and malware scan.
For this check, I suggest using an online tool like VirusTotal.
You can simply drag and drop the VPN installation file into scanner, and within seconds, it will show you if any anti-virus engines have picked up on known viruses, malware or trojans.
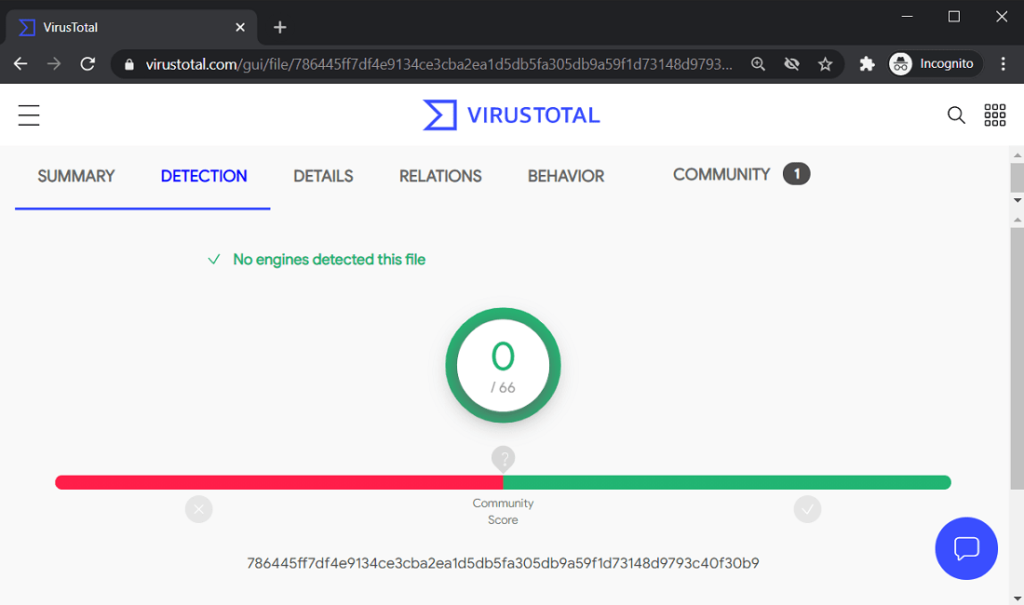
Above is an example of an earlier scan I did of the NordVPN app for PC.
The scan didn’t detect any known risks, which means the software was safe to install.
VPN checker tools for IP lookups & leak testing
There really are plenty of good resources out there for running VPN tests.
But here’s a non-exhaustive list of tools and lookup sites you can use to check for IP and DNS leaks as well as to test VPN speeds.
VPN test sites for DNS & IP leaks
- ipx.ac – by VPN.ac
- ipleak.net – by AirVPN
- Perfect Privacy VPN tests – by Perfect Privacy
- ExpressVPN’s Digital Security Lab
- dnsleaktest.com
- test-ipv6.com
- ipleak.org – by VPNArea
Speed test sites
- speedtest.net by Ookla
- Speedtest by Google
- fast.com by Netflix
Virus scan
If you found this guide helpful or have awesome VPN testing tips and tricks of your own, let us know in the comments below 👇
Ben Green
I've written reviews about VPNs and privacy tools for ten years, with the goal of helping people lead a secure and unrestricted life online. Founder of BestVPNz.com. Love sports and the outdoors.