
OpenVPN is a popular open source cross platform VPN protocol. Of all the platforms, Linux probably has the most possible methods of installing and running an OpenVPN client or server. There are a great many flavors of Linux out there (e.g. Mint, Ubuntu, Debian, Fedora, CentOS, Arch) just to name a few of the more popular ones. One of the biggest differences between many of the Linux distributions is how they handle package management, but nearly all distros are capable of installing directly from source code.
Looking for VPN recommendations? Check out our fully tested and reviewed Best VPNs top five.
There are advantages to rolling your own and compiling directly from the official source code. One of the biggest advantages is that you can ensure you are using a binary that has not been compromised with any back doors. However, most distros h ave safeguards in place to help ensure that their official packages can be trusted. However, nothing is fool proof and when dealing with a security focused application such as a VPN client or an encryption client, some people prefer to compile their own application from the official source code.
Installing from Source Code
If you are going to install from source, then you probably don’t need my help. The process follows the familiar GNU Autoconf process. But for those of you who have never compiled from source, and are curious, the steps are basically;
- Make sure you have a development environment installed on your system. (e.g. GCC, Autoconf, Make, Libtool, etc.) Many distributions have a package group to install the common development tools. On Arch Linux for example, the command “pacman -S –needed base-devel” will install the packages needed to compile source code.
- Get the source tar ball or Git sources.
- Verify GPG signature; why would you go to all the trouble of compiling from source without checking the signature?
- Unpack the source.
- Make any customizations.
- Ensure you have all the required libraries. (e.g. OpenSSL, easy-rsa, LZO)
- ./configure; make; make install
- Configure your particular client or server and run!
For those who are interested in this process the OpenVPN Wiki entry for building is a great place to start. Most users will probably just want to install pre-compiled binary packages from their distribution’s official repositories or their VPN provider.
Installing from Repositories
Whatever your Linux distribution, odds are that there is an OpenVPN package in your official repositories. Installation will vary from distro to distro. Often software is modified slightly to match the idiosyncrasies of your chosen distribution. Often these are minor changes such as where the configuration or binary files are installed.
Another nice feature of installing from distro repositories is most package managers will install the required dependencies. So, if you do not have the OpenSSL library installed on your system, your package manager should take care of that for you when you install OpenVPN. The following are a few examples, but you should refer to your distro’s documentation on how to install packages.
Arch
On Arch it is a simple as running:
$ sudo pacman -S openvpn
and then configuring your install.
Debian based distros
On distros that use Debian packages it should be as simple as running the command:
$ sudo apt-get install openvpn
RPM based distros
Many modern RPM based distros make use of the yum front-end. For example, to install OpenVPN on CentOS all one needs to do is type “sudo yum install openvpn” and on Fedora it is the same. If you have acquired the RPM package and do not wish to use yum then you can always use RPM, “rpm -ivh openvpn-[details].rpm“. You will need to make sure the lzo, pam, and openssl packages are installed yourself if using rpm.
Running the Command Line Client
After you have installed the OpenVPN client/server (the binary is both the client and the server) then it is almost as easy to execute it. You will almost always need root privileges. This is because OpenVPN needs to create a TUN/TAP device to route the VPN through, which on most systems will require root access.
You will need an OpenVPN configuration file, typically they have a *.ovpn extension. It is probably best if you start with your VPN providers supplied *.ovpn file. You can always modify it later if you wish.
Running the client is as simple as entering:
$ sudo openvpn ./myvpnserver.ovpn
from the command line. Replacing myvpnserver.ovpn with the name of your config file of course.
Now, most non-technical users are not very comfortable working with the command line. Rather, casual users are more comfortable with some sort of GUI. Lately, I have been using Linux Mint for my clients. It is one of the most popular Linux distros and my clients have had no troubles learning to use it. Since Linux Mint is so popular and more likely to have less technical users, the rest of this article is a Linux Mint tutorial with screenshots.
Linux Mint Cinnamon Desktop Tutorial
Linux Mint can use many of the popular desktops including KDE, Xfce and Cinnamon. The following tutorial is using the Linux Mint 17.2 Cinnamon edition.
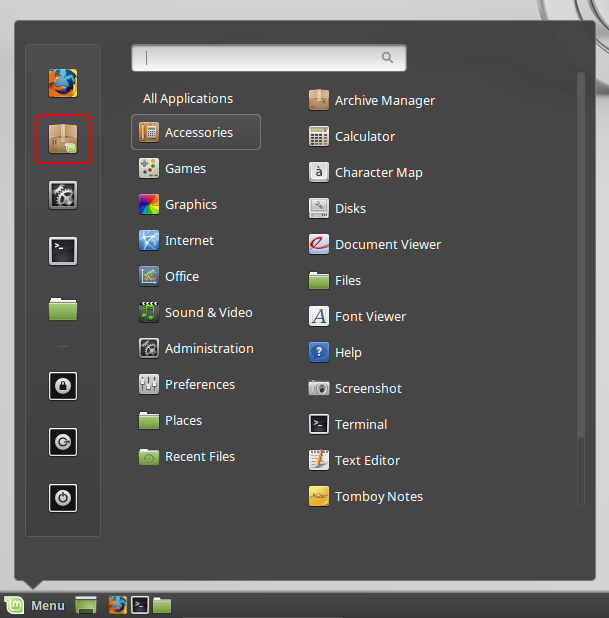
1. Install the OpenVPN package.
The first thing we need to do is install the OpenVPN package which is part of the official Mint repositories. So, click on the menu and then click on the Software Manager.
You will probably be prompted for your administrator or root password to allow the software manager permissions to install the package.
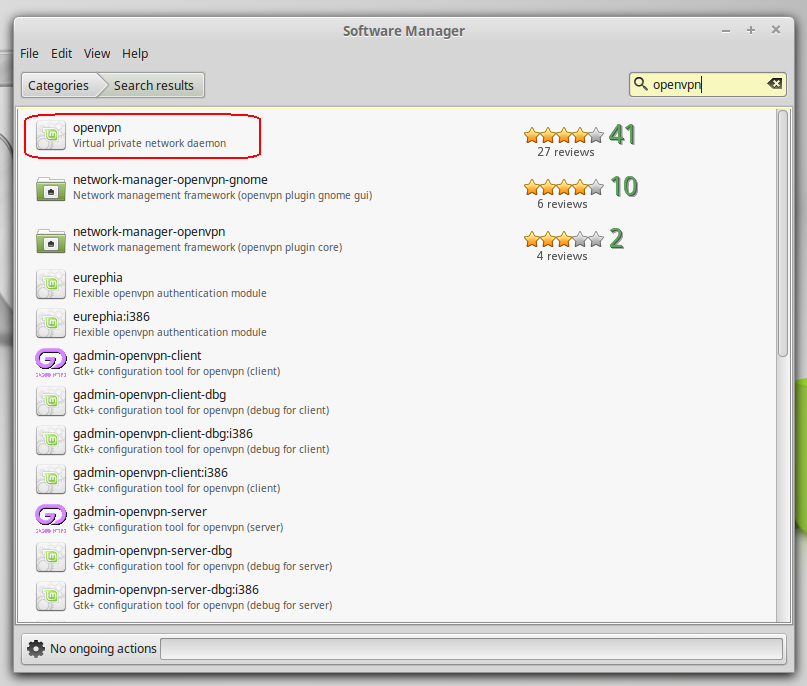
Once the Software Manager window opens, type “openvpn” into the search box and hit enter. You’ll probably get a number of hits but the red circled one is the one you want.
When you double-click on the openvpn package it will open up a description that also has an install button you can click to install the package.
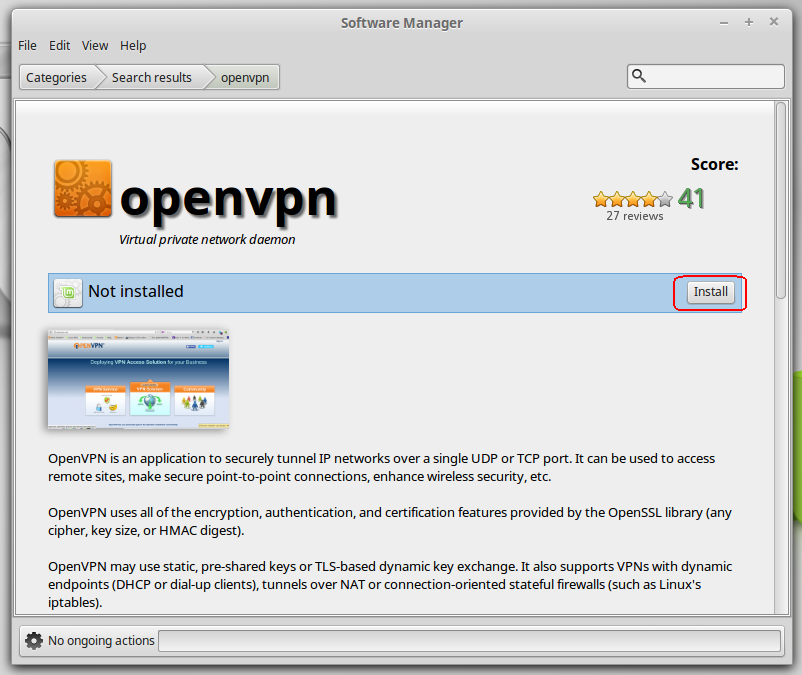
The Software Manager will give you some feedback and the Install button will change to a Remove button when the install is complete. That’s it, you just installed OpenVPN on your Linux Mint system.
2. Install NetworkManager
As much as I love Linux and other UNIX variants, I have to admit that configuring networks can be a real pain. Whilst command line tools are powerful, they can have complicated and esoteric syntaxes. To make matters worse, different distros can use different tools and services to manage network connections. Some variants use tools like ifconfig while others use systemd or the ip tools. On one Arch Linux system, I accidentally configured multiple network configuration methods at the same time, causing me all sorts of sporadic network problems. This is where NetworkManager can really save you some grief.
NetworkManager is a lovely framework originally developed by Red Hat but is now managed by the GNOME project. NetworkManager is a open source and distribution agnostic framework. It runs well on a variety of desktops (e.g. KDE, Cinnamon, Gnome, Xfce, etc.) and on many distros (e.g. Fedora, Gentoo, Debian, Mint, Arch, etc.). NetworkManager also makes use of plug-ins for configuration of networks like OpenVPN.
So, let’s make life easier and install the NetworkManager.
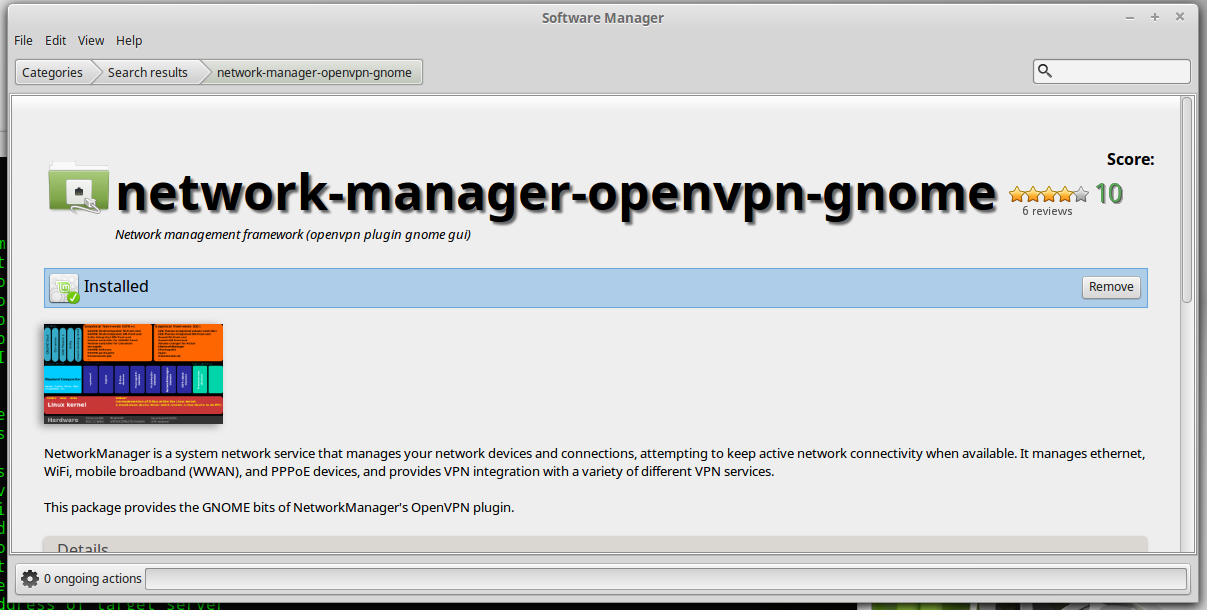
It looks like on my install I have the choices of network-manager-openvpn and network-manager-openvpn-gnome. Since network-manager-openvpn is a dependency of network-manager-openvpn-gnome we will install the latter and get them both.
We do this the same way we installed openvpn by double-clicking on the package and choosing the Install button.
Interestingly, when I went back to look at the network-manager-openvpn package in the Software Manager it didn’t show it as installed. However, a quick check of the /var/log/dpkg.log did show it as being installed before the network-manager-openvpn-gnome package. Once I closed the Software Manager and reopened it, it did then show network-manager-openvpn as being installed. Perhaps I should file a bug with the Software Manager?
Just to make sure that the Network Manager has picked up the plug-ins you should restart it with the following command:
$ sudo restart network-manager
If you find it easier you could always reboot your machine instead.
3. Configure your VPNs
Click on the Network Manager applet on the panel.

Then select the Network Connections option.
This will open up a new window in which you will want to click the Add button to add a new connection.
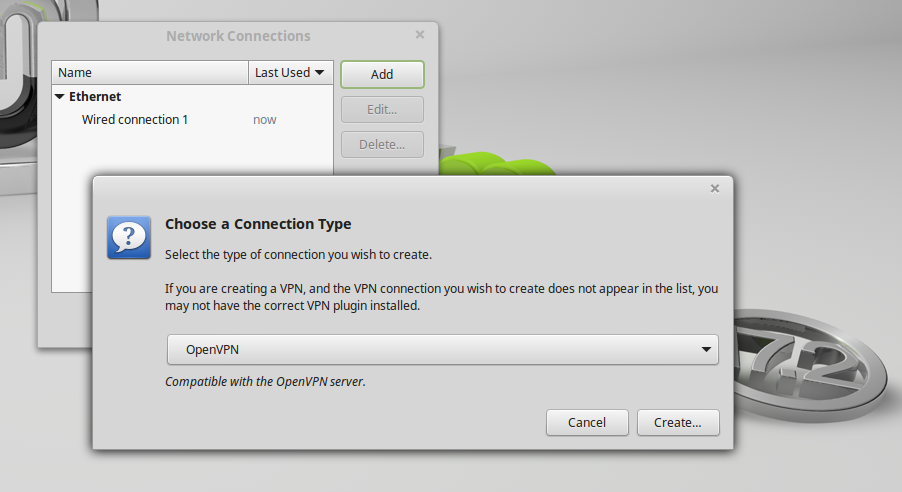
After clicking the Add button you will get a pull-down list of what type of connection. Look under the VPN section and select OpenVPN. Then click on the Create… button.
You can also choose the Import a saved VPN configuration… option from the pull-down menu. When you click the Create… button a file browser window will open allowing you to choose your *.ovpn file. Depending on how your provider’s OpenVPN config file is set up, this may or may not work for you. It may also partially fill in the config allowing you to enter the rest of your connection information. In any case, knowing how to dissect your OpenVPN config file and filling in the settings manually will work if the import does not.
Your VPN provider should provide OpenVPN configuration files. Often they come with many different configuration files in a ZIP or TAR file. Once you have some config files downloaded open one up, they are just text files and any text editor should work fine.
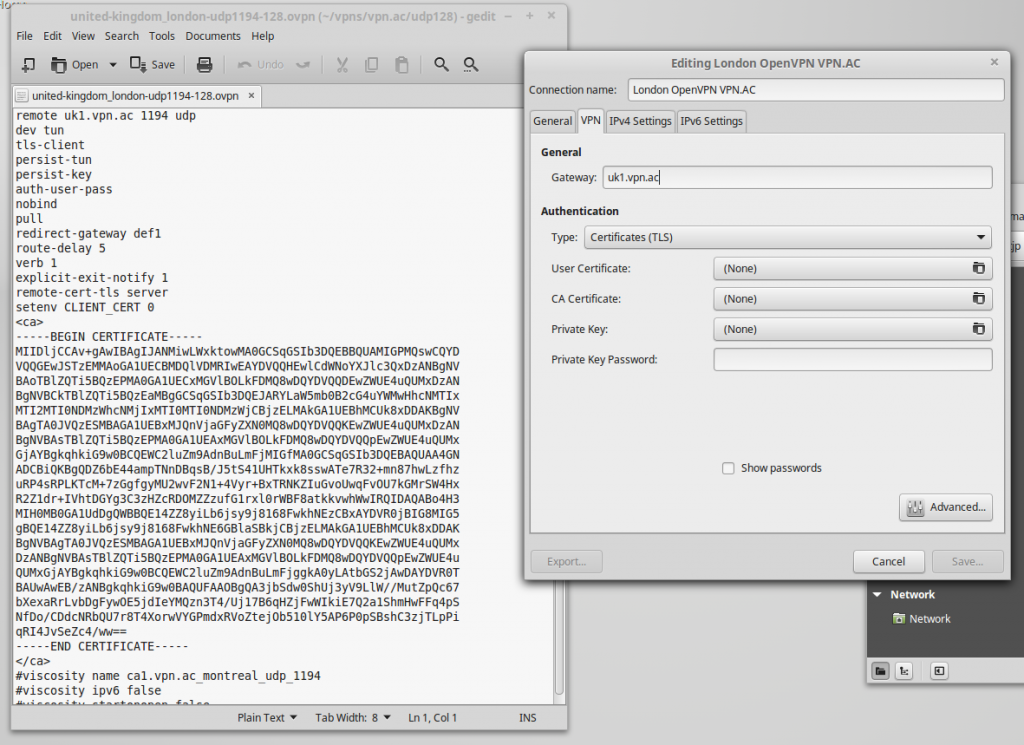
So, you will notice that the first line contains:
remote uk1.vpn.ac 1194 udp
This is the FQDN (uk1.vpn.ac) for the VPN server, the port (1194), and the protocol (UDP). Unless you are using the same provider, yours will be different.
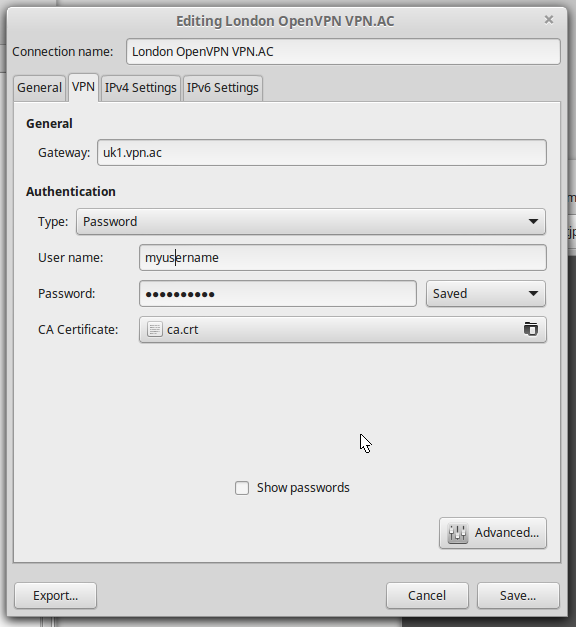
Fill in the Connection name: with something that will help you remember what it is.
Fill in the Gateway: with FQDN or IP address of your VPN server.
Under the Authentication Type: pull-down you will probably want to select Password. Most VPN providers use a username / password authentication method and this can be seen in the config file as the line:
auth-user-pass
Most providers also utilize a Certificate Authority (CA). In my example, it is embedded into the OpenVPN config file. I could cut the section starting with the
“—–BEGIN CERTIFICATE—–“and ending with the “—–END CERTIFICATE—–” and save that as a file but my provider also included a ca.crt file in their tar ball, and so that is what I am going to use.
When you click on the CA Certificate: button it will pull up a file browser allowing you to select your certificate file. Browse to where your file is and select it. Normally, a certificate file will have a *.crt, *.pem, or *.key file extension.
Now we want to click the Advanced… button. You may or may not have to set any of the options in here, but I find that you normally have to set something.
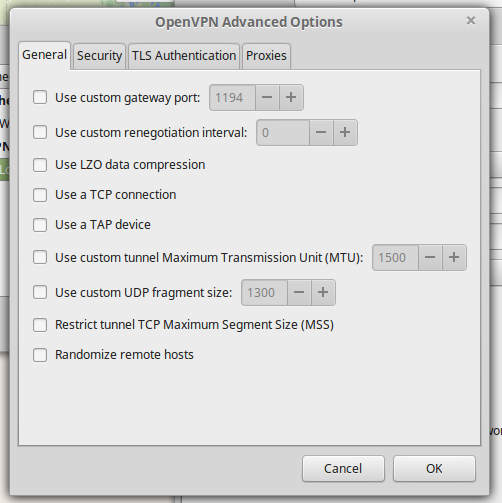
A common setting here is the Use custom gateway port: but in my case my server is using the official OpenVPN port of 1194 so I do not need to set anything. Another common option is the Use LZO data compression. However, you can often leave this alone and the server will push this setting to your client if needed. A less common option is the Use a TCP connection and in my config file you will notice my provider is using UDP port 1194. Sometimes you will need to use TCP in order to get around restrictive firewalls or if your network connection is particularly unreliable. However, TCP is usually not as efficient due to the TCP meltdown effect.
If you see the option:
comp-lzo
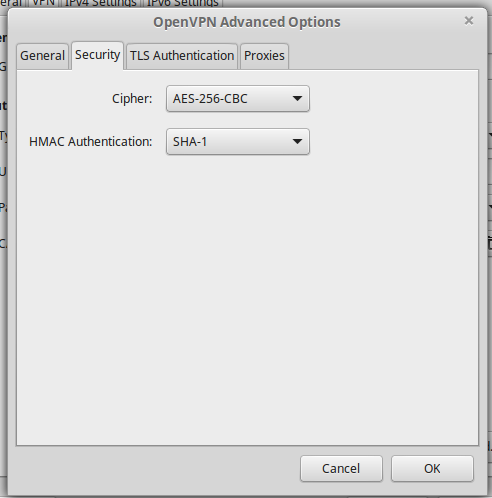
cipher AES-256-CBC
auth SHA1
In this example my provider is also using TLS authentication. So I am going to click the TLS Authentication tab.
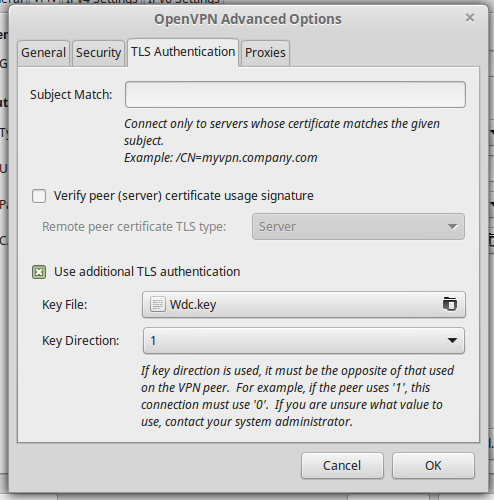
The configuration file line for this option looks like this:
tls-auth Wdc.key 1
In my case Wdc.key is the name of the key file and 1 is the Key Direction. Unless you are using the same provider yours will likely be different. Just like with the CA cert file click Key File: button and browse to and select your key file. You can also click the Key Direction: button to select the proper direction.
That is all the options that need to be set up for this particular configuration. So, click the OK button and then you will be brought back to the main configuration window and click the Save… button to save the new connection.
4. Connect to your VPN
Once again you will want to click on the Network Manager applet on the panel.
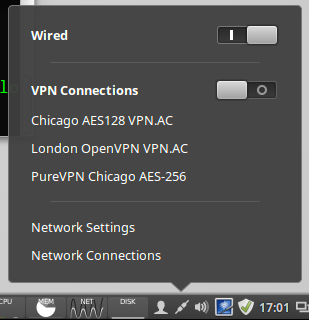
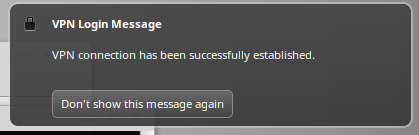
You will notice that there is now a VPN Connections section on the applet. In the above image I have three different VPN connections configured. Click on the connection you wish to use and when the connection is established you should get a pop-up message like this:
The Network Manager applet should also change to show a lock icon.
That’s it! You now have your VPN connection set up in Network Manager. The setup should be similar on any flavor of Linux and any desktop using Network Manager. Enjoy!

This command don’t run:
$ sudo restart network-manager
But I got my connection with:
sudo service network-manager restart
Thanks for the excellent tutorial (and excuse-me for my bad English).
I have just bought a new Mini computer which I have formatted and loaded Mint 20.1. Having been a Linux user for some years and I had previously used Proton VPN. I was however having no amount of trouble re-connecting it on my new PC until I found your brilliant tutorial. I followed it to the letter and connected at 1st attempt. Thanks a bunch.
Hi,
Thanks for the detailed info. I have a working VPN link now. However, I want to provide for split tunnelling. I know I can turn off blanket routing and then use rout commands for the routes I want to go through the VPN. The problem is that I cannot find the file that needs editing (presumably openVPN.config). According to various docs it is in /etc/openVPN except there is pretty well nothing there, a script and two folders, client and server (both empty). I found a ‘.connection. file that would appear to belong to network manager, but its format is different. Honestly I am now lost and need a helping hand.
Oops, I should have added some context. The client is running Linux Mint 20 with Netwrok Manager (v1.8.24) and openvpn (v2.4.7-1 ubuntu2) client installed.
The server is HMA London UDP and TCP.
Thank you very much for such a detailed set of instructions. I was able to set the VPN correctly and can connect to my home network without issues. As a matter of fact, I can also print to my home printer. However, what I am unable to do is use the Nautilus file browser. It refuses to work over VPN. Any ideas as to why that is?
Please– I followed your valued instructions which seemed to set up the vpn. However, I continue to get the message that “the connection is timed out”. I have tried several gateways but no success.
Please reply to
[email protected]
I think it means that your going to disconnect to a wifi for example and instead to vpn network which you must pay for internet connection? and thats the .ovpn file was all about ?
Hi, followed your directions in getting OpenVPN client from Synaptic Package Manager as well as the Network Manager (for LinuxMint 17 Mate) and used *.ovpn files supplied by the VPN people. When I used wifi on my HP Pavilion Laptop, I tried to +add the VPN via my wifi entry on the GUI-network connections whose menu only shows PPTP and no OpenVPN. When I import and “create” the *.ovpn file into the networkmanager Gui, I get an error “not a PPTP extension.” I figure the OpenVPN client didn’t “take” somehow but how can I get the client to list in the network connections gui? Any help appreciated.
Thanks Ted for your article. This is the most explicate directions I have found for installing a VPN on linux. However, after following your instructions to the “T” it still doesn’t work. I had to copy and paste my CA and TLS certs. Not sure if that’s the problem. Using Linux Mint Cinnamon 18.2. Any suggestions?
I am trying to do this via the .ovpn file but my ca and certifications files does not get generated and the save button is greyed out. I then generated them on an ubuntu system and now manually point to them, Save button now active but don’t get a connection to my openvpn server. I’m using Linux Mint 17 Cinnamon x86.
You got me further than even my instructor could BUT still not working. Wont connect. No matter the configuration or pwords I use.
well this tutorial was a complete waste of my time. NONE of it on my system sows what you post and you assume far too much for a non techie.
Using mint 17.3 KDE 64 bit.
I create the network thingy you said after muddling through and it asks for a gateway. What gateway? I want to use it on all kinds of public wifi. I cannot figure out what the gateway is supposed to be nor hot to get the information.
You mention cs certificates. No mention on where to get them how to get them etc.
It shouldn’t be anywhere near this complicated to install, setup, and use a vpn across every wifi system.
Point click, install via a deb package that has EVERYTHING in it and ready to go is the proper way. Then click on network and connect to whatever public wifi in the list with open vpn already the default so no unnecessary user intervention is needed.
Here is another problem:
“You will need an OpenVPN configuration file, typically they have a *.ovpn extension. It is probably best if you start with your VPN providers supplied *.ovpn file. You can always modify it later if you wish.”
Ok no mention of where to get it find it put it etc.
OpenVPN is in my repo but nothing there says anything about that file you mention.
“$ sudo openvpn ./myvpnserver.ovpn
from the command line. Replacing myvpnserver.ovpn with the name of your config file of course.”
Nothing about naming any config file in your directions. Nor what to do with the file (how to actually put something in there usable).
“3. Install NetworkManager”
Every version of linux has a built in network manager. Without it you cannot get online at all.
“Your VPN provider should provide OpenVPN configuration files.”
Isn’t openvpn supposed to be it’ own provider? This is confusing.
What files? Aren’t they included in the repository with openvpn???
If not no mention of where to get them etc.
Your tutorial is far too geeky and complicated for normal people to set up let alone use.
Got any point and click GUI stuff that does all this for a user???
Everything should be set up by default so all one needs to do is select whatever wifi they are using and in another line in the network manager select to NOT use vpn keeping vpn the default across all connections.
Also, what do you do about places that force you to click ‘I accept” just to connect to their network???
What is a gateway anyway???
I will thank you for the time you took to create this advanced tutorial. It did take a bit of effort on your part. I just wish it wasn’t so geeky.
Point, one click click auto install & auto config, select, connect. THEN people can play with drop down settings if desired.
crazysquirrel,
You’re confusing OpenVPN the program with a VPN service. You use OpenVPN to connect to a server managed by a VPN service provider. Think of it as similar to your ISP. It’s a second connection you need to make after you’ve connected to the internet. You should pick a provider and pay for the service – don’t trust the free ones. Many of them will have what you’re looking for: a client you can install that has a user interface to click to connect. That way you don’t have to setup OpenVPN at all.
The reason to use OpenVPN (or PPTP or L2TP ) is if your VPN service provider only gives you connection credentials, not a program to install, or if you just don’t want to install the program for whatever reason, or the program doesn’t work on your system.
I’m using VPN Unlimited and I’m happy with it because it’s a one time lifetime subscription (find a deal though, don’t pay full price). They do have a program you can install and not have to do this setup. But, there are many out there, usually for a few bucks a month, so pick one you like.
To address your questions, the gateway is the server of the VPN provider that you’re connecting to. You only need to set it up once, unless you want to be able to connect to more than one server, maybe in a different location. You’ll be able to connect to that server no matter where you are, or what wifi you’re connected to. The VPN creates a tunnel from your computer to that gateway so all of your traffic now appears to originate from that server instead of from your computer and the public wifi or home or work ISP that you’re actually connected to.
Brian Blair,
You’re an asshole! Be more thankful at least… Ted is trying to help, so more appreciation for his efforts would be more suited, than your stupid comments on his article.
I have hunted for a clear description how to install PIA openVPN on Debian 8.5, and you seem to have solved one of my problems. Thanks! I do have another problem that I’d be very appreciative for your input. After installing VPN, everything looked good, I select the desired PIA Connection, a password is requested for authentication, but the connection is terminated, i.e., connection was turned “off”. Please advise me on where to look, I am lost…
Thank you for your assistance!
The save button is greyed out…
so I cannot save the config.
gateway, password and username are entered. I don’t see that all the other settings are imported from the ovpn file
Hi Jarak,
Often the “import a saved VPN connection” option doesn’t automatically retrieve all the options you need to set.
For example, it does not seem to pull out an inline CA. If you don’t have your CA in a separate file, you can cut & paste it from your *.ovpn config file. You can refer to the part of the tutorial where I talk about pulling the Certificate Authority from your config file for further information on this.
hope that helps,
–Ted
This is the worst instructions ever! All you did was explain how to install it! And then assumed everyone would know what to do after installation! You never explained were the config files needed to go! And you left out many other details! giving instructions to new users usually means they are new to this! Therefore they need all the full details and explanations! You can’t skip over important details and expect a newbie to read your mind!
Hi Brian,
I am sorry to hear that you did not find my article helpful. I spend quite a bit of time and effort to help people through my writings. I try to write my articles and target them to a technically unsophisticated audience. Of course, I have to assume some basic knowledge. I mean I could begin by trying to explain how to power up your computer, but you have to start somewhere.
Perhaps you did not read my entire guide? As you can see beginning in “Step 4. Configure your VPNs”, I describe how to configure your VPN connections. I did assume that you would either know how, or search for another tutorial, in order to be able to open your VPN provider’s configuration files. As an example googling “how to open a text file” results in more than 331,000 results.
You will also note that in step 4, I proceed to explain what to look for in your OpenVPN config files, and the appropriate settings in NetworkManager. You will also note that I supplied a number of images to help you as you work through this guide. Seven images in step 4 alone.
Also, using NetworkManager you do not need to put your “config” files anywhere. NetworkManager handles all of that for you.
Perhaps if you could explain what exactly it is that you are stuck on, I could help you further.
kind regards,
–Ted Parvu